Before I go on, press “Play” below. While the song is playing, click the circular “joystick” inside the triangle and drag it around. Try taking the joystick all the way towards any of the vertices to hear more from a single artist. If you are intrigued how this works, then read on.
In Slavic folklore, there is a powerful woodland spirit called Leshy, who mimics human voices to lure lost wanderers into its caves. While Leshy’s imitation of friendly voices sounded magical a thousand years ago, we now live an age where it is possible using Artificial Intelligence. The above is not just a demo of voice cloning, but a glimpse of how AI is reshaping creative expression and arming artists and creators with new tools to bring their ideas to life.
2025 is shaping up to be the year of open-source AI which started with Deepseek R1 starting a revolution and OpenAI and Google both launching high performance reasoning models for free. With commoditization of AI on the horizon, it is hard to find value in keeping up with AI unless you work on the bleeding edge of this AI race. For an average person, value can lie in how you wield these tools to fuel creativity and bring your ideas to life in ways that could very well have looked like magic before. This voice cloning demo was created using a fantastic piece of technology called RVC. The triangular user interface to sample the same song in real-time in different singer’s voices was also created using ChatGPT.
In this blog post, we’ll cover:
- What is RVC and how it is different from other AI models like text-to-speech conversion?
- Practical applications of RVC technology.
- A quick “under-the-hood” look at how RVC works.
- A step-by-step tutorial for local training and inference.
- ChatGPT prompt for generating the front-end UI
Resources#
Here are some helpful links to get started:
- Sample model weights (for Arijit Singh, trained for 100 epochs)
- Official set-up and tutorial for RVC
What is RVC?#
RVC stands for Retrieval-based Voice Conversion, an open-source AI algorithm that enables speech-to-speech transformation with remarkable accuracy. Unlike text-to-speech (TTS), which generates speech from text, RVC focuses on converting one voice into another while preserving vocal attributes like modulation, timbre, and emotional tone. You can speak into it or feed in a voice, and it spits back what you spoke, but in another voice (the voice on which the model was trained), while retaining the voice acting.
Some popular models for text-to-speech (TTS) and speech-to-speech are:
- TTS (e.g., Tortoise TTS): Converts text-to-speech (TTS) while retaining some realistic prosody and intonation. However, the output can often sound robotic
- So-VITS SVC: Speech-to-speech conversion. A predecessor of RVC but less efficient and less capable in real-time applications.
- RVC: Speech-to-speech conversion. Also supports, real-time voice conversion with improved accuracy and emotional fidelity.
Language is very powerful and complex. Where text-to-speech fails is ability to convey emotion via tone, pauses, emphasis, pitch, etc. Where Speech-to-Speech excels is in retaining those qualities. However, the output is dependent on size and quality of training data. RVC is not competing with TTS, they are often complementary. You can use TTS to generate speech from text and then pass it through RVC for lifelike voice modulation.
Practical Applications of RVC#
-
Content Creation: Create a clone of your own voice or create a unique voices for your videos. The workflow can often use TTS for script narration which is then passed through RVC for realistic tones. If you are creating an audiobook, a combination of TTS + RVC can help.
-
Gaming, Entertainment: Design personalized voice profiles for video game characters. Mix voices to create entirely new ones for creative projects.
-
Memes: Ever wondered how Shah-Rukh Khan would sound apologizing for making the film Happy New Year? I recorded my own voice, trained an RVC model on SRK’s 18-minute audio clip for just 20 epochs as a test. And here is the result:
The possibilities are endless. Create your own sports commentary with the voice of your favorite sports caster, fan fiction content, AI song covers and even resurrect old artists from the sixties.
Note on the Ethical Concerns: While exciting, this technology raises concerns about misuse in deepfakes, identity theft and fake political campaigns. Proceed responsibly!
How Does RVC Work?#
As with any large scale AI models, the under the hood workings of the model can be like a black box in a lot of ways. Imagine RVC as a vocal sculptor: it isolates the raw clay of speech (phonetics) and reshapes it with the texture of a target voice (timbre). The RVC model has roughly the following stages
[Input Speech] → [Feature Extraction] → [Voice Conversion Model] → [Output Speech]
-
Input Speech Analysis: The algorithm captures input speech in chunks and processes them in real-time, maintaining low latency for voice conversion. It analyzes your input speech—capturing pitch, tone, and timbre.
-
Feature Extraction: Using a database of pre-trained voice features, it extracts relevant vocal features from the input speech using advanced algorithms like RMVPE (Robust Model for Vocal Pitch Estimation), which helps prevent muted sound problems and ensures accurate pitch detection.
-
Retrieval and Voice Conversion: The algorithm finds pre-recorded speech segments that are most similar to the input speech. It then converts the input speech to match the target voice characteristics. However it maintains modulation and timbre which are useful to convey emotion. The magic happens here—in a way, the RVC model separates the input voice features in two buckets:
- the voice characteristics that are replaced with the target voice (using a model trained on the target voice)
- the phonetic and emotions that are retained from the input voice, and used with the new target voice
Tutorial: How to Use RVC#
Ready to try this yourself? Here’s a step-by-step guide (some knowledge of coding is helpful, if you get stuck, use Google or ChatGPT to solve the errors that you may encounter).
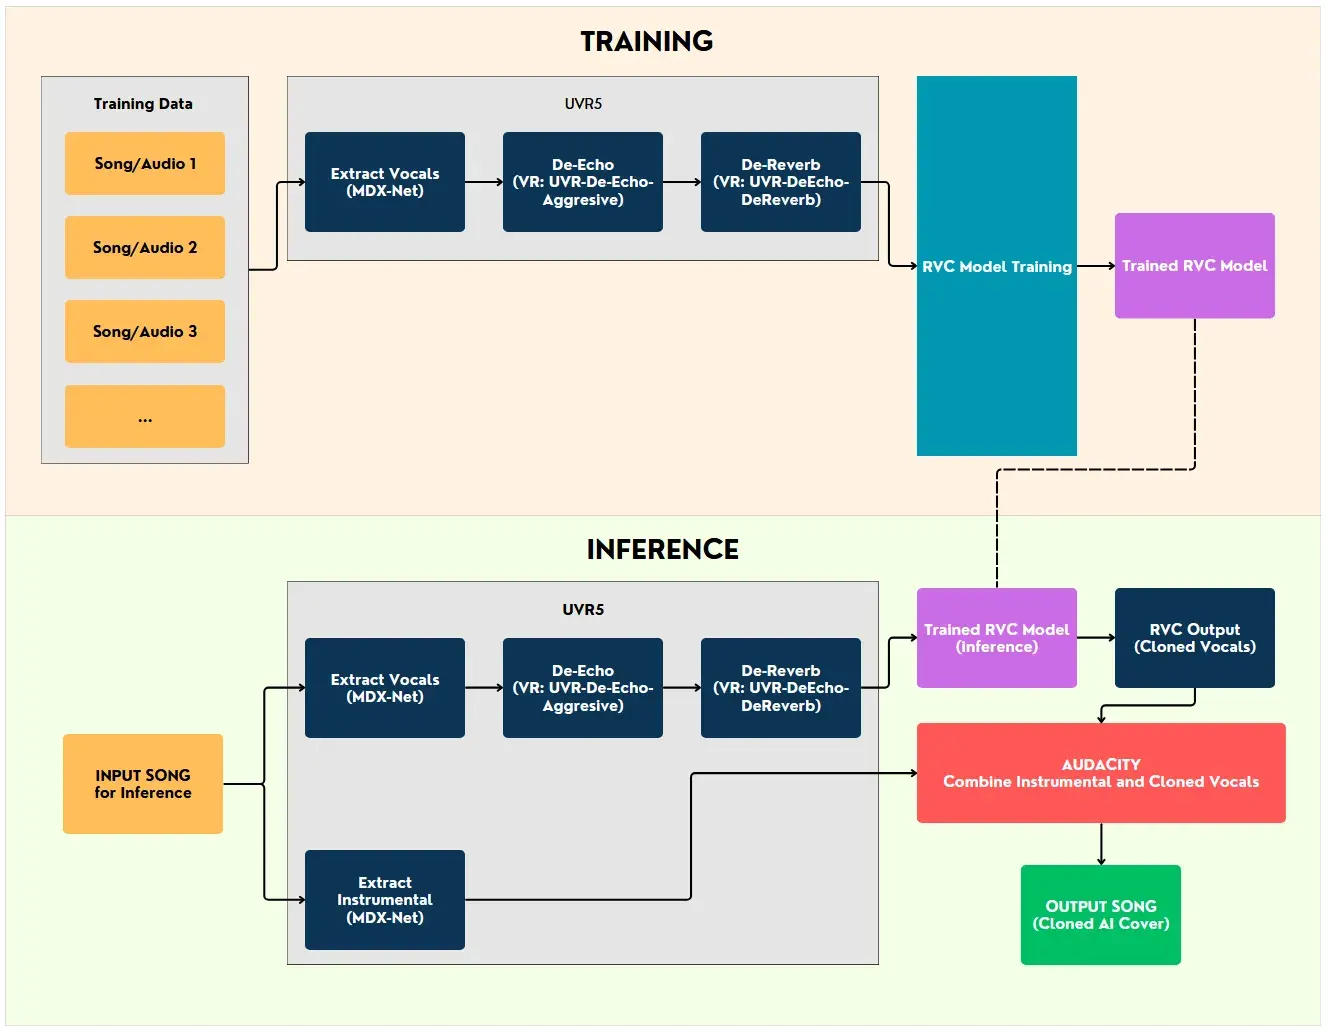
Overall Workflow
Pre-requisites#
- GPU with at least 8GB VRAM. You can either rent cloud GPUs or use Google Collab or run locally. Just remember that it requires CUDA compatible Nvidia GPU support (I used RTX 4070 laptop GPU that took 3 hours to train 100 epochs with 30-minutes of training audio data).
- At least 20 GB of disk space to store the voice models
- Other tools:
- UVR (Ultimate Vocal Remover) An open source and free tool for cleaning training data.
- Audacity A free and open source digital audio editor
- Python 3.10 (to avoid dependency hell). If you already have a python installation, you can install Python 3.10 in a virtual environment. I prefer using Conda to manage environments.
Preparing Training Data#
Good training data is key! Otherwise, if you feed in garbage, the output you will get is processed garbage. If recording your own audio, use high-quality microphone and record in a quiet room to avoid background noise. If using existing audio, ensure to use high quality audio. For a decent training data size, it is recommended to have at least 30 to 40 minutes of audio for training, but 15 to 20 minute can also give decent results. Ensure language consistency between training and output data— example, if you want to output to be in English, use training data that is also in English. Otherwise, you’ll end up with weird accents (unless that’s what you are going for!)
I highly recommend processing the training data using UVR to remove any noise artifacts. Especially when training on Songs, UVR is a powerful tool to extract vocals using stem separation. For creating AI song covers, use the above workflow for preparing training data using UVR.
Pro tips for better training data:
- The most important aspect is quality, then quantity, then diversity of your training audio. Example, if a song has repeating Chorus multiple times, then its not adding new information for the model to learn from. Diversity also means having a variety of emotions or voice modulations.
- If using songs for training data, use the above workflow using UVR to extract vocals. Avoid using duet songs which have more than one voices going into training.
Setting up RVC Web UI#
These instructions are only for Windows/Linux/WSL2 and only for Nvidia GPUs. For other GPUs or for Mac installation check out the detailed set-up instructions
1. Clone the official Github repository Download all files or clone the repository from the official GitHub repository. I prefer to download all files and run the AI models using WSL2, but using Windows is just as fine.
2. Prepare the environment
- You will first have to install Python. For this project, it is better to install Python 3.10. Other versions can lead to dependency failures where some of the libraries that are required to run the model will require different versions of Python to run.
- Option 1: For Linux/WSL, I am using Conda (requires Windows 10 or later when using WSL)
- Download and install Anaconda from the official website.
- Verify install using the following command:
conda --version - Create a new environment “rvcenv” with Python 3.10:
conda create -n rvcenv python=3.10 - Activate the environment :
conda activate rvcenv
- Option 2: For Windows
- Download Python 3.10 installer from python.org
- Run the installer, ensure to check “Add Python to PATH”
- Open Command Prompt and create a new directory:
mkdir my_project cd my_project - Create a virtual python environment called “rvcenv”
python -m venv rvcenv - Activate the environment
rvcenv\Scripts\activate
Rest of the instructions are for both Windows and Linux/WSL. For Mac users, better to see the instructions from the official source.
- Open Windows Terminal or Command Prompt
- Install main dependencies - pytorch is the main python library AI models
pip install torch torchvision torchaudio - Then go to the directory of the download RVC repo and run the following to install all requirements
pip install -r requirements.txt - Download other Pre-models: RVC requires other pre-models to infer and train. While still in the RVC main directory, run this python script to download all required pre-models OR you can manually download them from their Huggingface space.
python tools/download_models.py - Install FFmpeg - this is the a free and open-source set of libraries used for audio (and video) processing.
Alternately for Windows, just download the following files and place them in the root project folder: ffmpeg.exe and ffprobe.exe
sudo apt install ffmpeg
3. Running the Web UI The hard part is now over.
- To start training the model using the web UI, in the root directory, use the following command:
python infer-web.py - For Windows users, download and extract file
RVC-beta.7zfrom Huggingface space, then double click ongo-web.batThe web UI to training and inference will open in a web browser window with either addresshttp://0.0.0.0:7865orhttp://localhost:7865/
Training the model#
In the Web UI, you will see something like below after going to the “Train” section from the top navigation.
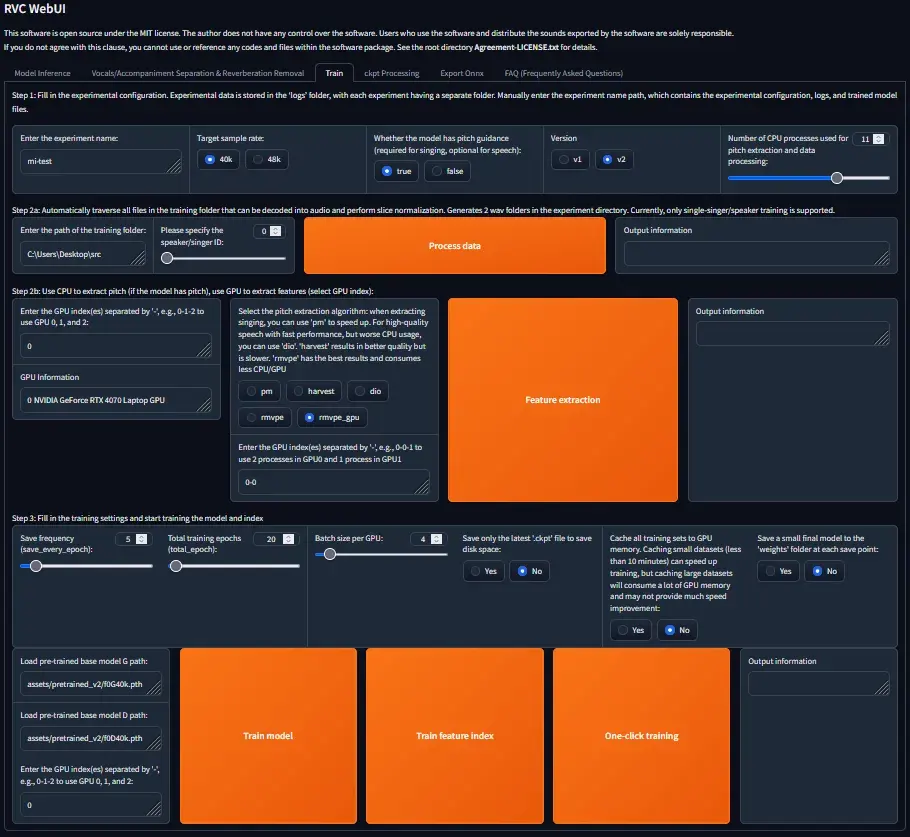
- Keep most settings as is unless specified or if you know what you are doing. You can either run each Step mentioned in the UI one-by-one (Process input data > Feature Extraction > Train model > Train feature Index), OR , you can configure everything in one-go and click on One-click training.
- Step 1:
Number of CPU processesshould be lower than what your CPU can handle. For example, if CPU has 8 cores, keep it at less than 6. You can experiment with higher values until you hit an error - Step 2a: Enter the path to the folder where your training data is stored after pre-prossing (audio files in wav format. Use Audacity to change to wav format if its in another format).
- Step 2b: Enter GPU index of the GPU that you would like to use. Using a dedicated GPU is a must. Many laptops and PCs have Integrated GPUs with CPUs, they are a bad idea and will be too slow. Under
Enter the GPU index(es)...section, ensure you enter the index of the dedicated GPU. The GPU information section tells you the index for different GPUs, if you have only one, then its usually at index 0. - Step 3:
Save frequencyhelps save a copy of the model in between every X cycles, more frequent save points result in more hard-disk space usage. KeepTotal training epochsat least >40, and ideally 200 to 300 depending on your training data length and quality. The ideal way to determine is by looking at the loss function using something like Tensorboard, but for now, use what your GPU can handle without running hot for hours. Start with something like 20 to test if model is working in the right direction. - Step 3: You will have to start by using some base pre-trained model that comes with the RVC installation. The pre-trained model has a base model G (I’m using
assets/pretrained_v2/f0G40k.pth) and a base model D (I’m usingassets/pretrained_v2/f0D40k.pth)
Now you can begin training. Once the training is complete, there will be a model weights file (.pth file of pytorch) with the same name as your experiment name in the assets directory (example: assets\weights\mi-test.pth)
Pro tips for good training:
- You can also use other pre-trained models to “further” train and fine tune. You just need the base G and base D models from them. You will find lots of models on Huggingspace (https://huggingface.co/models?other=rvc) and Google pretrained on celebrity voices. You can also use your own existing model and train it further, the base G and base D files for your previously trained model can be found in the logs directory
- Experiment with Batch size per GPU . A higher number will speed up training, but can fall in memory overflow issues if set too high for your GPU to handle. You can stress test it and experiment to get to the right number
Inference#
Now the fun part begins. You can now feed an input voice/audio to the model and it will convert it into an output audio with the voice that the model is trained on.
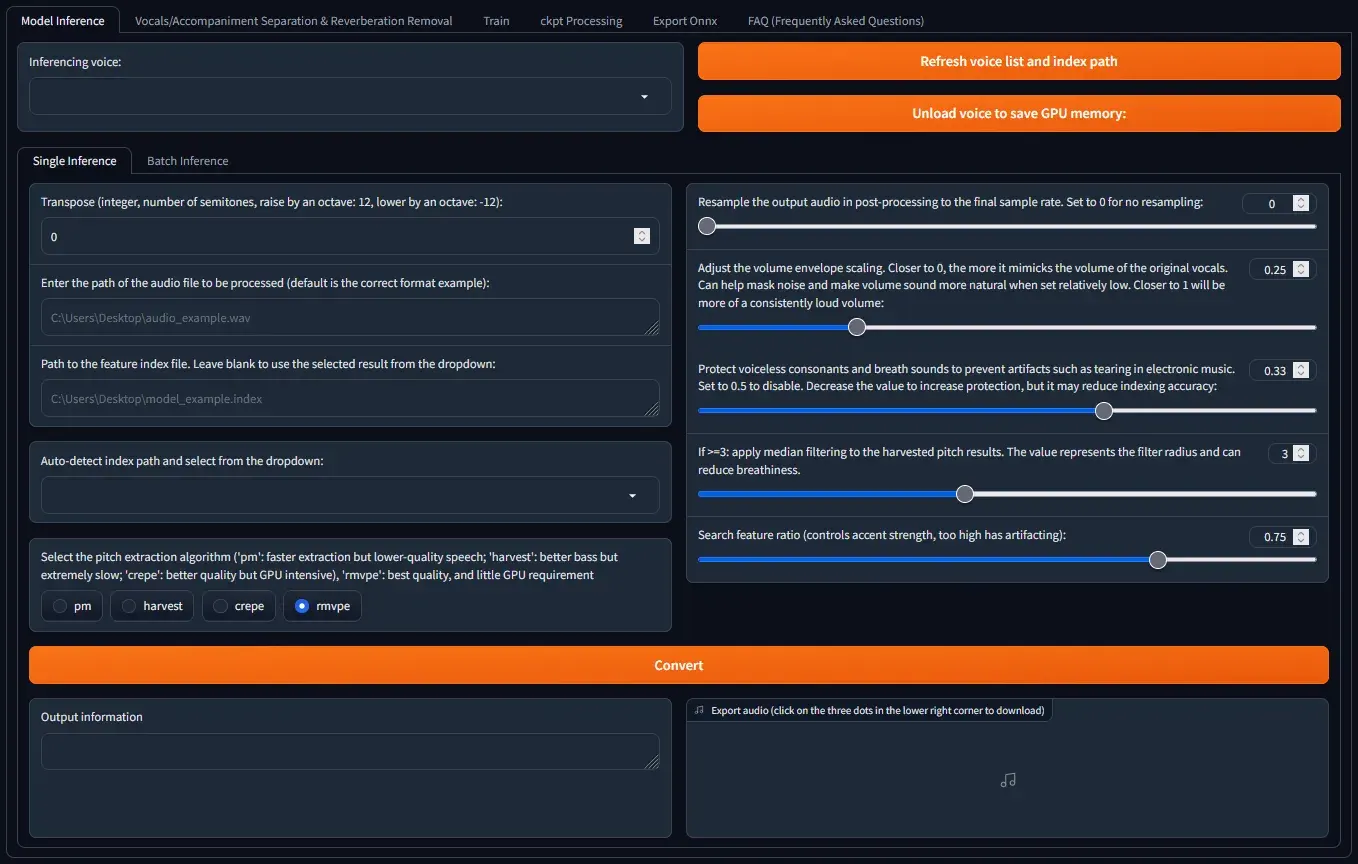
- Go to the
Model Inferencesection. Select your newly trained model from the dropdown underInference voice. If it does not appear, click on “Refresh voice list and index path” Enter the path of the audio file to be processed (default is the correct format example):Enter the input audio file path here.- Keep all other setting as is for now (unless you know what you are doing)
- Click
Convert - In few seconds to minutes, you will have your output audio that you can proceed to play or download.
Pro tips for good inference
- To get the exact pitch of the output voice, experiment with the
Transposesetting. A positive value indicates a higher pitch (+12 is raised by an octave), and negative value indicates a lower pitch (-12 is lower by an octave) - You can play around with other settings to refine the output further (they are explained well within the UI)
BONUS: How I built the front end UI above to showcase the model output#
First I created the three audio files:
- File 1: Original song
- File 2: Voice clone #1 (Trained on singer Arijit Singh’s voice for 100 epochs and 30-minute audio training data)
- File 3: Voice clone #2 (Trained on singer Kishore Kumar’s voice for 100 epochs and-30 minute audio training data) Make sure to convert all files to mp3 or another compressed format for showcasing over Web.
Then I used ChatGPT with the following prompt to arrive at the base Javascript, CSS and HTML code that I can add to a webpage.
I have used voice cleaning to create 2 AI covers of the same song. Song 1 (original song in voice of artist 1), Song 2 (in voice of artist 2), and song 3 (in voice of artist 3). Now I want a creative way to present it on my blog. I want to create a javascript based UI which is an equilateral triangle. The triangle is divided in three equal parts with three lines that meet at its centroid. The centroid is a joystick like button that can be moved anywhere within the triangle. As the centroid is moved, the lines connecting the button and each of the vertices also move such that they are always connected to the vertices and the button. All three songs should be played simultaneously in perfect sync. Each section of the triangle that is divided in 3 parts should have a background image of each artist. When the button in moved around, the volume of each artist song should vary based on the surface area visible for each artist image in the triangle. Example, if the button is moved all the way to one of the vertex, then the entire surface area of triangle is under a single artist, so the other 2 artists should go almost mute. Can you write to me the necessary javascript, css and html code to achieve this?
After a few follow-up prompts, I was able to arrive at the desired result. I also used Canva to upscale the artist images (AI is being used everywhere)
Final Thoughts#
RVC isn’t just a cool demo—it’s about enabling creativity at scale. Whether you’re an artist looking to expand your toolkit or just someone who loves experimenting with tech, this is your playground.
So what will a forest dweller from 9th century Kievan Rus (modern day Ukraine) think about today’s voice cloning technology? In a way, it is still magic! Somehow, the humans tricked some rocks into thinking. What a time to be alive.